Navigate to and select your site's faculty/staff directory listing folder. Remember: directory pages must be in the same folder as the directory listing in order to be displayed.
Click Add Content > Directory Page.
Fill in an appropriate Page Name (no spaces, all lowercase) — the standard is lastname_firstinitial.
Fill in the First Name, Last Name, and Position or Rank fields.
With the directory person's permission, fill in the NameCoach Email Address field. Include their full W&M address, ending in @wm.edu or @email.wm.edu, used to create their audio file atnamecoach.wm.edu. An audio button will appear next to the name on the Directory page. Note that NameCoach audio cannot be previewed in Cascade — publish the page to test and listen. For issues creating a NameCoach recording, email W&M IT at support@wm.edu.
Set the right column, parent and sibling checkboxes. These adjust the right column and page menu on this page only.
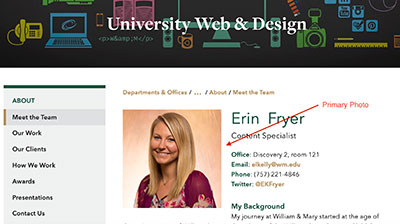
Under Primary Photo, click Choose File to select the photo that will display on this page. (See Step 1 above.)
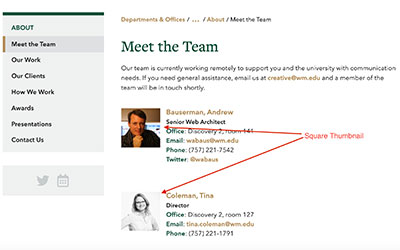
Under Square Thumbnail, click Choose File to select the photo that will display on the Directory Listing Page. (See Step 1 above.)
In the Directory Info section, use the plus sign to create additional sets of info you'd like to see to the right of the Square Thumbnail on the Listing Page. For example, many A&S Departments list Office, Phone, Email and Webpage as separate sets. In the Info Title field, fill in the name of the set. Fill in the Info Value field for each separate set, e.g. Blow 150, 757-221-4000. For an email address, enter just the W&M Username in double square brackets, e.g. [[blcole]]. For a webpage, place double curly brackets around the URL, e.g. {{http://wmpeople.wm.edu/blcole}}.
For custom link text add a comma and the desired text, e.g. [[blcole, Contact me]] or {{http://www.google.com,Visit Google}}.
Note: The directory listing page will list up to the first 5 sets of Directory Info for each directory entry in the folder.
In the Biographic Info section, use the plus sign to create larger descriptive sections that will appear under the photo and directory info on the page. For example you might include sections for 'Areas of Specialization' or 'Background and Education'.
Do not copy and paste directly from another source (Word, email, webpage). First copy from the source, then in Cascade click Edit >> Paste as Text before you paste. You can also clean up your text by first pasting it into a text editor such as Textpad or Notepad.
Note: By default, directory pages display on the Directory Listing Page in alphabetical order (by last name). If you prefer to manually order your Directory Listing Page, send a request to [[creative]] and we will activate this feature. Once manual ordering is activated, the display order is controlled by folder order.