Faculty can quickly set up their Blackboard courses each semester using the Blackboard Course Generator. The generator is linked to Banner data so instructors can easily create courses after they have been assigned in Banner and students will automatically be enrolled in the course as they add/drop -no extra steps needed. Instructors can also use the Generator to add Teaching Assistants or colleagues, while complying with FERPA policies from the Registrar’s Office.
Flexible course availability: Control student viewing access to your course by making them available or unavailable upon creation.
Customize course titles: Easily change and personalize course titles to better suit how you would like it to be displayedd to students.
Effortless batch course creation: Create multiple courses simultaneously, saving you time and effort.
Expanded role management: Add additional instructors, teaching assistants, graders and Course Builders to your Academic courses with ease using the Universities FERPA polices.
Merge and link cross-listed courses: Seamlessly combine and connect cross-listed courses for streamlined management. Merging and linking of non-cross listed courses can be requested from the Registrar.
Create non-academic courses: Easily create non-academic courses in Blackboard to serve as supplements to the teaching and learning experience.
Best Practices for Creating Academic Courses
Non-W&M users cannot be added to academic courses. In order to have the requested user addedTo add the requested user, create anaffiliate account first. For a full list of options, visit the Non-W&M User Scenarios of the Update page.
Consider setting the course as unavailable upon creation if you would like to prevent student access as you design or edit your course content. If this option is selected, instructors need to make it available from within Blackboard before the class begins for students to access.
Instructors have the opportunity to preview each step of the course management process when using the Blackboard Course Generator, giving control to ensure courses meet individual course needs. After submission, the course(s) will be automatically created, and student enrollments from Banner will seamless integrate.
After a course has been successfully created within the Blackboard Course Generator, they will appear in this portal with the heading Blackboard Course: Course ID and Name of course in the Academic Course listing.
Before instructors' merge or link course sections, ensure the course is approved for merging by the University Registrar. After receiving approval, instructors can create their courses through the Generator.
It is recommended to merge or link courses BEFORE you have added content, and students have begun to participate in your course.
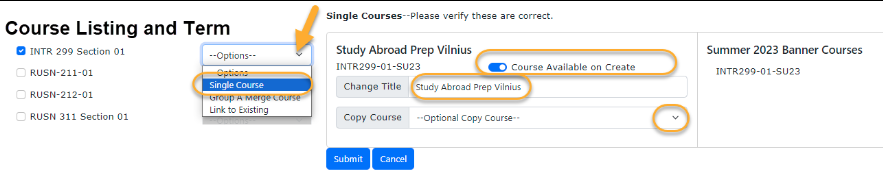
Select Course: Select the checkbox next to the course to create from the Course Listing and Term section.
Select the Single Course option from the dropdown menu.
Optional preview: If you are not creating additional courses, click the "Preview" button.
Verify the course options available:
Select the Course Available on Create toggle to make the course immediately available to students upon submission.
Modify the course title (if necessary).
Choose whether to copy content from an existing course or start fresh with a new course from the dropdown menu. Please note, only courses that are not archived and where you are enrolled in as an instructor will be available in this list.
Click the Submit button to complete the course creation process. The course will appear in your dashboard in Blackboard within 15 minutes.
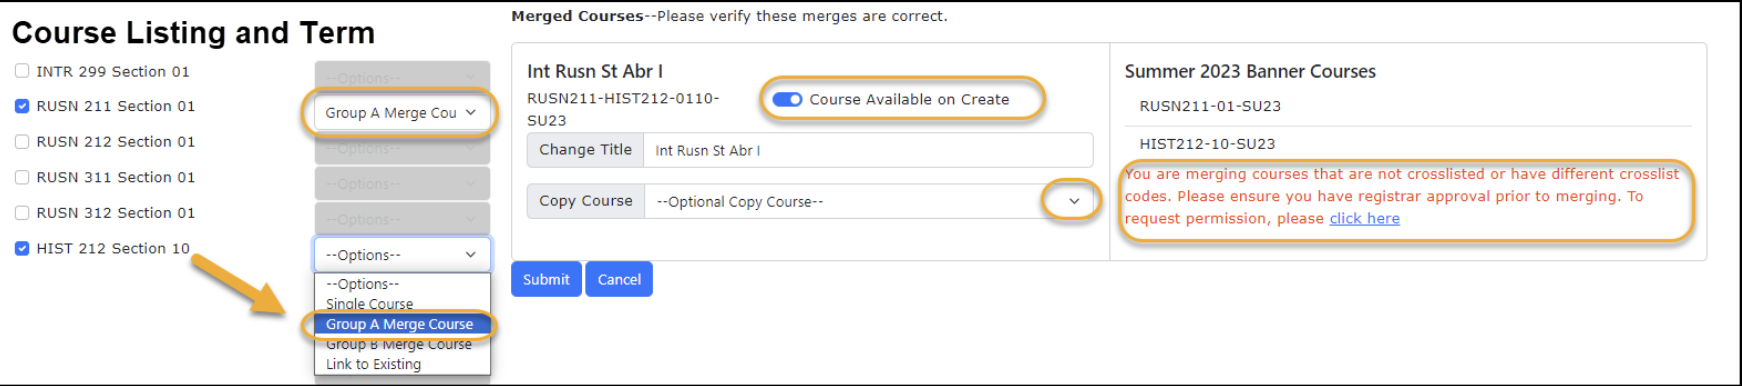
Create a Merged Course
Request approval for merging courses, particularly if the course sections are not officially listed courses in Banner.
Select Course: Select the checkbox next to the course to create from the Course Listing and Term section.
Identify the appropriate Group # that corresponds to the courses you want to merge. For instance, in the provided example, selecting Group A will merge the two selected courses.
Optional preview: If you are not combining any more courses, proceed by clicking on the "Preview" button.
Verify the course options available:
Select the Course Available on Create toggle to make the course immediately available to students upon submission.
Modify the course title (if necessary).
Choose whether to copy content from an existing course or start fresh with a new course from the dropdown menu. Please note, only courses that are not archived and where you are enrolled in as an instructor will be available in this list.
Click the Submit button to finalize the merging process and complete the course creation process. The course will appear on your dashboard in Blackboard within 15 minutes.
Link a Course to an Existing Blackboard Course
Request approval for mergeing courses, particularly if the course sections are not officially cross listed courses in Banner.
Select the checkbox next to the course to create from the Course Listing and Term section.
Select the course that is currently in Blackboard to link to from the dropdown menu that appears.
Optional preview:If you have finished linking courses, click "Preview."
Verify the course options available:
Select the Course Available on Create toggle to make the course immediately available to students upon submission.
Modify the course title (if necessary).
Choose whether to copy content from an existing course or start fresh with a new course from the dropdown menu. Please note, only courses that are not archived and where you are enrolled in as an instructor will be available in this list.
Click the Submit button to finalize the merging process and complete the course creation process. The course will appear on your dashboard in Blackboard within 15 minutes.
Modify Courses Created
modifying courses created
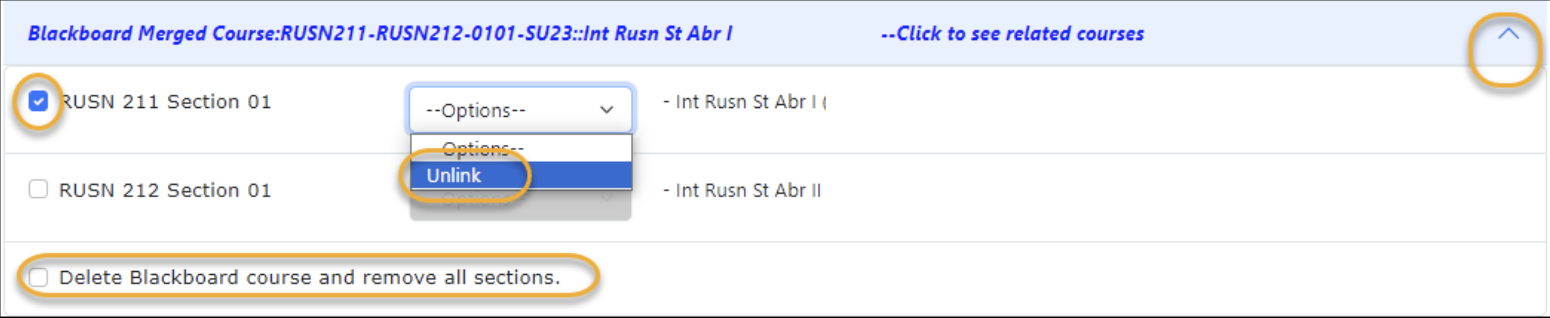
Deleting Merged and Linked Courses
Please Note: Do not unlink or delete courses if students have grades in the grade center as this will remove their grade history and cannot be undone.
Select the Academic Courses link from the main menu.
Find the merged courses at the bottom of the course listing.
Expand the details of the merged courses. You will have the option to:
Delete all merged courses and start over.
Unlink a specific section from the merged course.
Preview the changes you have made to ensure they are as desired.
Click the Submit button to finalize the merging process and complete the course creation process. The course will appear on your dashboard in Blackboard within 15 minutes.
This process should only be completed at the start of the semester to be able to merge a course to limit data and student activity loss. This process will not remove the course that has been taught for a semester and will be marked for deletion so they can go back and select it again to be created.
Manage User Enrollments
Manage User Enrollments
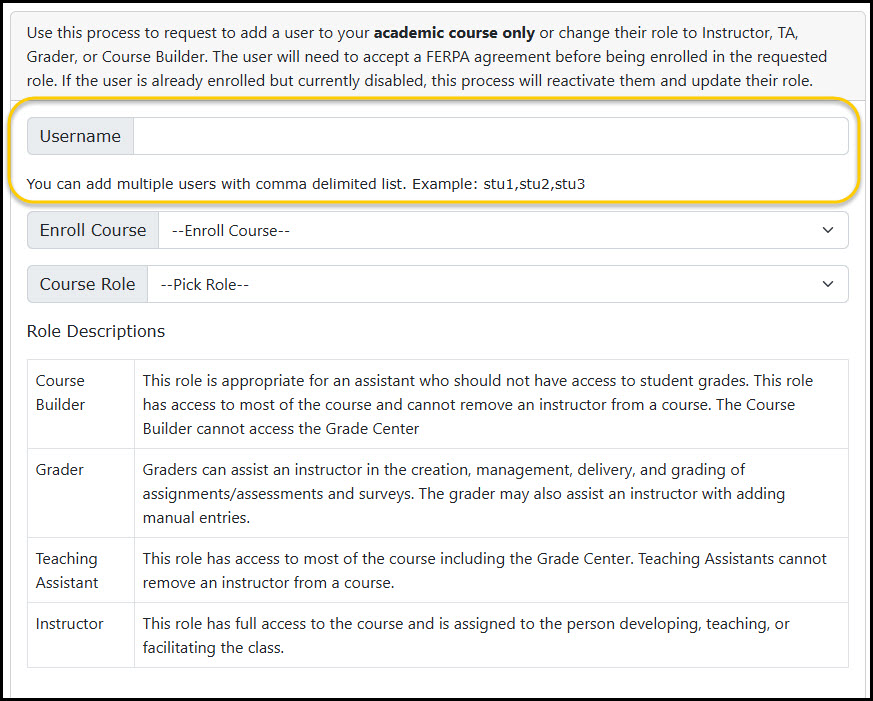
Add User / Elevate Roles in Academic Courses
Please note: This process is considered a role change request and requires the user to acknowledge FERPA requirements before officially enrolled in the course in adherence with W&M’s FERPA policy.Non-W&M users cannot be added to academic courses. To add the requested user in Blackboard, create anaffiliate account first.
The following roles can be added in Blackboard:
Course builder: This role is appropriate for an assistant who should not have access to student grades. This role has access to most of the course and cannot remove an instructor from a course. This Course Builder cannot access the Grade Center.
Grader: Graders can assist an instructor in the creation, management, delivery, and grading of assignments/assessments and surveys. The grader may also assist an instructor with adding manual entries.
Teaching Assistant: This role has access to most of the course including the Grade Center. Teaching Assistants cannot remove an instructor from the course.
Instructor: This role has full access to the course and is assigned to the person developing, teaching, or facilitating the class.
Enter the user’s username: Type or enter the user’s W&M username, not their 93 number. If you have multiple users, separate their usernames with a comma and no spaces. For instance, “student1,student2,student3”.
Select the name of the course from the dropdown menu in the Enroll Course section.
Select the role from the dropdown menu in the Course Role section.
Click the Submit button to complete the role request process. The user will be enrolled after they complete their FERPA acknowledgement. Advise them to check their email for instructions.
Once the instructor submits the role change request, an email will be sent to the respective users account. This email will seek their acknowledgement (previewed below) in accordance with W&M’s FERPA policy. After the acknowledgement is signed, the role adjustment will be updated within the Blackboard course and an email will be sent to the instructor.
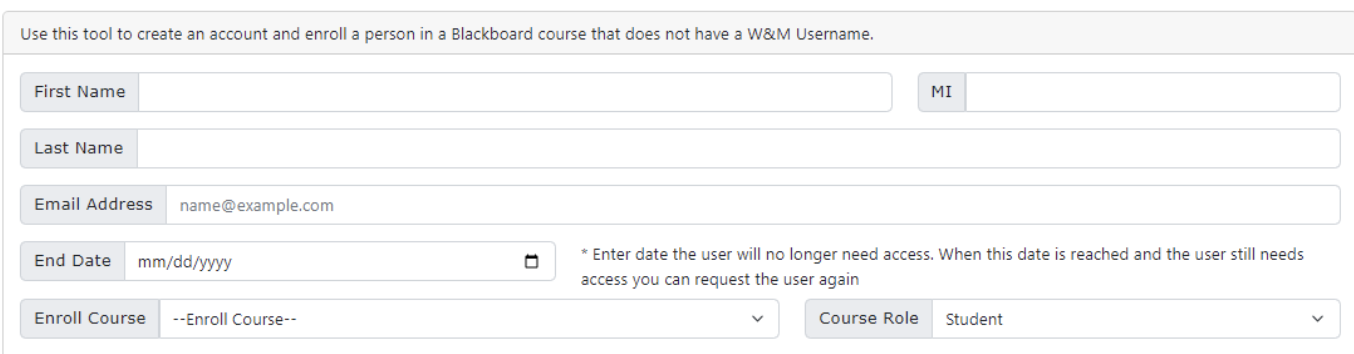
Creating Non – W&M users
Non-W&M users cannot be added to academic coursesin Blackboard. To add the requested user in Blackboard create anaffiliate account first.
After the successful creation of a Non-W&M user, an email notification will be sent to the individual. The email will contain instructions on how to login to Blackboard, utilizing their assigned username and password.
Upon account creation, the individual will automatically be enrolled as a student in the requested course. To log in, Non-W&M users can navigate to Blackboard and select the Non-W&M login option. In the event of password issues, users have the option to initiate a password reset by clicking on Forgot Password.
For additional assistance, reach out to the Technology Support Center at support@wm.edu.