
Listbox
How to build one and where to put it.
Listboxes are right-column boxes that share characteristics of both listing pages and widgets. Similar to listing pages, listboxes produce a formatted, clickable list of the items in a listing folder. However, rather than listing ALL of the items in the folder, you choose to show between one and 10 of them. Similar to widgets, listboxes can be placed in the right-hand column of any page.
Need to put an existing listbox on your page? Skip to Step 2.
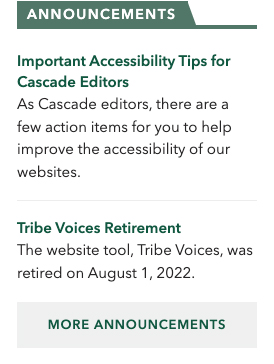
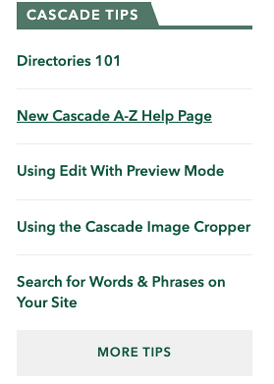
Sample Listboxes
Announcements is an announcements Listbox with summaries set to appear. Cascade Tips is a features Listbox with summaries set not to appear.
Instructions
Step 1: Build the Listbox
- Select the folder where your listboxes are stored. Often sites will have a root folder named "_listboxes" or "listboxes." If not, you may need to create an empty folder for storage and name it appropriately.
- From the top menu, choose Add Content >> Right Column Items >> Listbox Folder (if this asset is not available to you, please contact your Cascade Manager)
- Replace the default Folder Name (lowercase, no spaces) then Submit. A "listbox folder" with two files will be created for you. The files will be called 'Listbox' and 'blockofcontent'.
- Select the file named Listbox and click Edit.
- Create a header (title) for your listbox one of two ways:
- Prebuilt: Select a "pre-built" Header Text Option
- Custom: Select "(custom)" for Header Text Option, enter text in the Custom header text field.
- For the Listbox type field, select the type of pages that are to be listed in this listbox. Your choices are Announcements, Stories, Features, Feed and custom. Feed supports RSS and Atom feed types (event listboxes use this feed type). Feeds display in date order. The rest use folder order.
- For Feed type listboxes only, enter a web address in Feed URL. Be aware that Feed listboxes offer realtime content updates and should only be connected to a trusted source.
- The address can usually be obtained by clicking on an orange RSS icon on the source website.
- For W&M Events: choose one of the following Feed URL formats and replace "calendarname" with your calendar's short name:
- https://events.wm.edu/calendar/upcoming_rss/calendarname
(this will display any events that have not yet ended – this includes ongoing events that are in progress as well as any events that have not yet begun) - https://events.wm.edu/calendar/upcoming_only_rss/calendarname
(this will display only upcoming events that have not yet begun) - https://events.wm.edu/calendar/ongoing_rss/calendarname
(this will only display ongoing events)
- https://events.wm.edu/calendar/upcoming_rss/calendarname
- Select the maximum number of items you want to appear in your listbox.
- You can opt to show the brief summary from the listed items (when available) by choosing "Yes" for the 'Show item summary' field.
- More button: All listbox types can have a call-to-action button at the bottom.
- Enter Custom text if desired. The default text varies by listbox type: "More Events," "More Announcements," "More," etc.
- Enter the destination page. For Announcements/Stories/Features listbox types, use the internal page chooser to select the index page of the listing folder. For Feed listbox types, enter the URL in the external page field. Custom listboxes may link to an internal or external page.
- Click Preview Draft >> Submit >> Check Content & Submit.
- For Announcements/Stories/Features listbox types only, select and edit the file named 'blockofcontent'. Locate the field labeled 'Index Folder', click on the default link provided to activate the file browser to select the Folder of files to be listed in your listbox. Click Confirm. Note: For Feed type listboxes you may delete the 'blockofcontent' file.
- Publish your listbox folder.
Step 2: Put the listbox on a page
- Select and edit the page where you want to place the listbox.
- Check the box next to 'Show right column?'
- Under the Listboxes section, click "Choose Page" to browse to the Listbox file and select it then click Choose.
- Preview Draft >> Submit >> Check Content & Submit then Publish.
Troubleshooting
Why doesn't my Listbox show up on a published page?
Listboxes need to be published separate from the page(s) that contain them. Make sure that your Listbox folder is published.
I entered a custom text header but it is not showing up?
Edit the Listbox and make sure that "(custom)" is selected for Header Text Options. Republish.
Why does the listbox only show "Loading..." for my feed?
Make sure that the feed URL you have provided is valid by checking it using the W3C Feed Validation Service.