
Using the W&M kubernetes cluster
Using the W&M Kubernetes (K8s) cluster
NOTE: You must request access to the k8s cluster via hpchelp once you have your hpc account.
- Overview
- Namespaces
- Pods and Jobs
- kubectl and other commands
- Storage volumes and accessing NFS filesystems
- Getting images for pods
Overview
Access: The front-end/login server for the RC kubernetes cluster is cm.geo.sciclone.wm.edu. You must be logged into this server to access the kubernetes cluster.
The Research Computing (RC) Kubernetes cluster is a newer resource compared to the traditional HPC/Slurm batch cluster. It was created to support research workflows that benefit from containerized environments, reproducibility, and flexible scaling. Singluarity based Containers can be used on the W&M HPC/Slurm batch clusters, however, this is the minority of jobs. In Kubernetes, containers are used in all workloads.
Both systems let you run scripts to launch workloads, but the style and structure differ:
-
HPC/Slurm: Jobs are typically submitted via shell scripts with directives (e.g.,
#SBATCHflags) that define resources and runtime behavior. -
Kubernetes: Workloads are defined in YAML files, which describe the desired state of your application (resources, containers, and policies).
In short: HPC uses directives in scripts, while Kubernetes uses declarative configuration.
Why Use Kubernetes?
-
Containerization: Run software in reproducible environments without worrying about module systems or dependencies.
-
Scalability: Spin up multiple pods/jobs easily for parallel workloads.
-
Flexibility: Good for workflows involving services (databases, dashboards, ML model serving) that HPC batch queues don’t handle well.
Namespaces
Namespaces in Kubernetes provide a way to organize and isolate workloads, so different research groups or applications don’t interfere with each other. Namespaces is just an abstraction of a username. In fact most namespaces in our k8s cluster are just usernames. In our k8s cluster there are two types of namespaces:
User namespaces- Named after your username (e.g., jdoe).
- Intended for short running jobs (max walltime must be less than 5 days)
- Restriction: You may only run Jobs here — pods are not allowed.
- Shared by a group of users working on the same project.
- Suitable for production or collaborative workloads.
- You can run both Pods and Jobs here and pods have no restriction on walltime.
Pods vs. Jobs
In most Kubernetes clusters:
-
Pods are the fundamental unit. A pod usually runs one container (though it can run multiple tightly coupled ones). Think of a pod as “one compute job” on HPC, but without a built-in runtime limit.
-
Jobs in Kubernetes are a higher-level object that manages pods. They ensure that a task runs to completion—restarting pods if necessary. A Job is closer to an HPC batch job, where the system ensures your work finishes, even if something fails mid-way.
Key differences to note:
-
Like the Slurm/Batch clusters, jobs have a maximum walltime (currently 5 days for k8s jobs)
-
In Slurm, the scheduler directly allocates nodes/cores. In Kubernetes, you request resources (CPU, memory, GPU) via YAML, and the scheduler fits your pod/job onto available nodes.
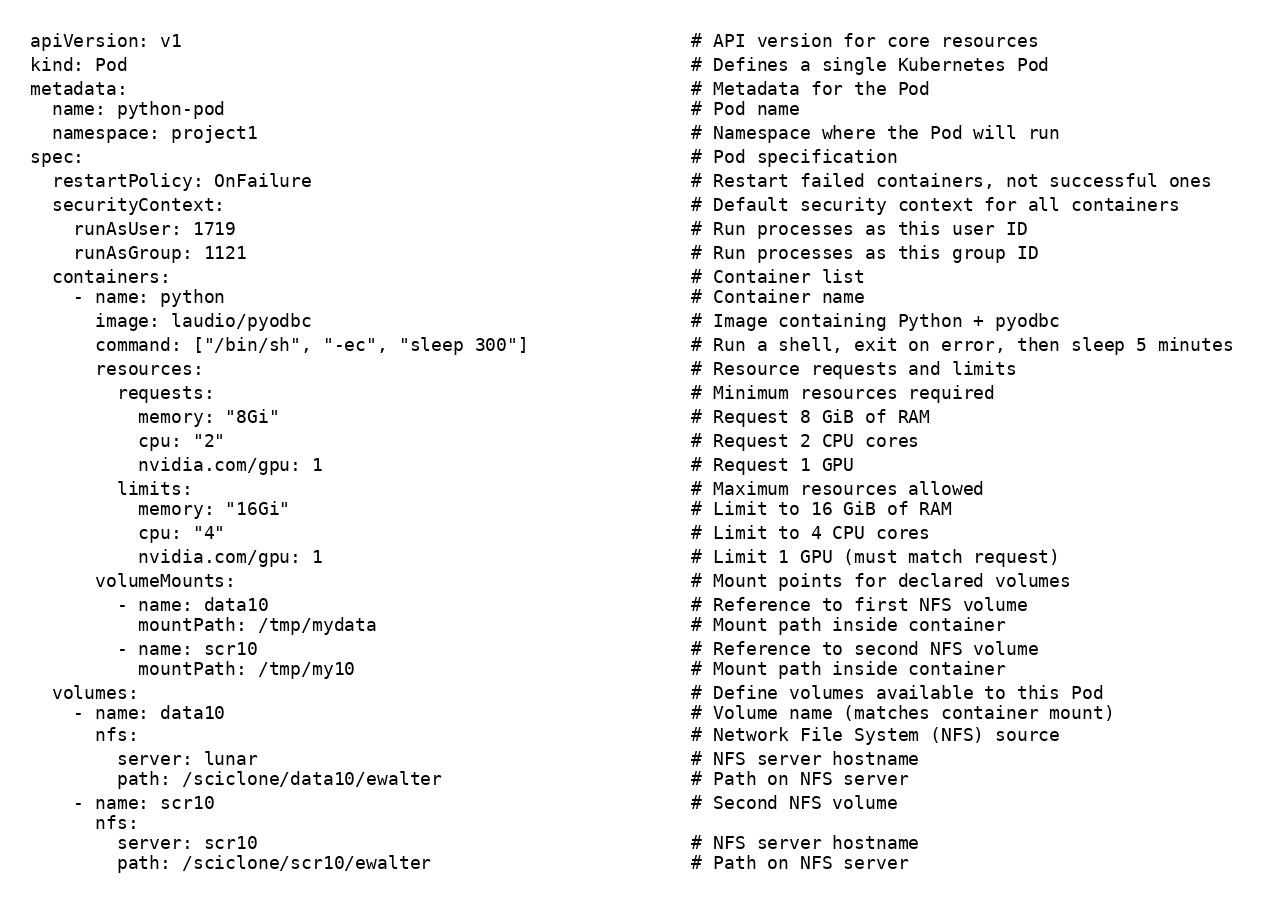
Here are two examples that do the same work. The first is a pod example, second, a job example. These two objects do nearly the same thing:
-
Creates a Pod named
python-podin theproject1namespace. -
Runs a single container named
python. -
Pulls the image
laudio/pyodbc(default registry:docker.io) available on: https://github.com/laudio/pyodbc -
Starts the container with
/bin/sh -ec "sleep 300"(execute command string; exit on any error). -
Sets restartPolicy: OnFailure (restart only if the container exits non-zero).
-
Runs processes as UID 1719 and GID 1121 via Pod
securityContext(use the Linux command id to find your UID and GID) -
Requests at least 8 GiB RAM, 2 CPU cores, and 1 GPU (for scheduling).
-
Limits the container to 16 GiB RAM, 4 CPU cores, and 1 GPU (hard caps) (PLEASE DON'T REQUEST a GPU if you don't need one)
-
Mounts NFS volume
data10from serverlunarpath/sciclone/data10/ewalterto/tmp/mydatain the container. -
Mounts NFS volume
scr10from serverscr10path/sciclone/scr10/ewalterto/tmp/my10in the container. -
Declares both NFS volumes under
spec.volumesand references them undervolumeMounts.
Example pod:
(click here to download text version)
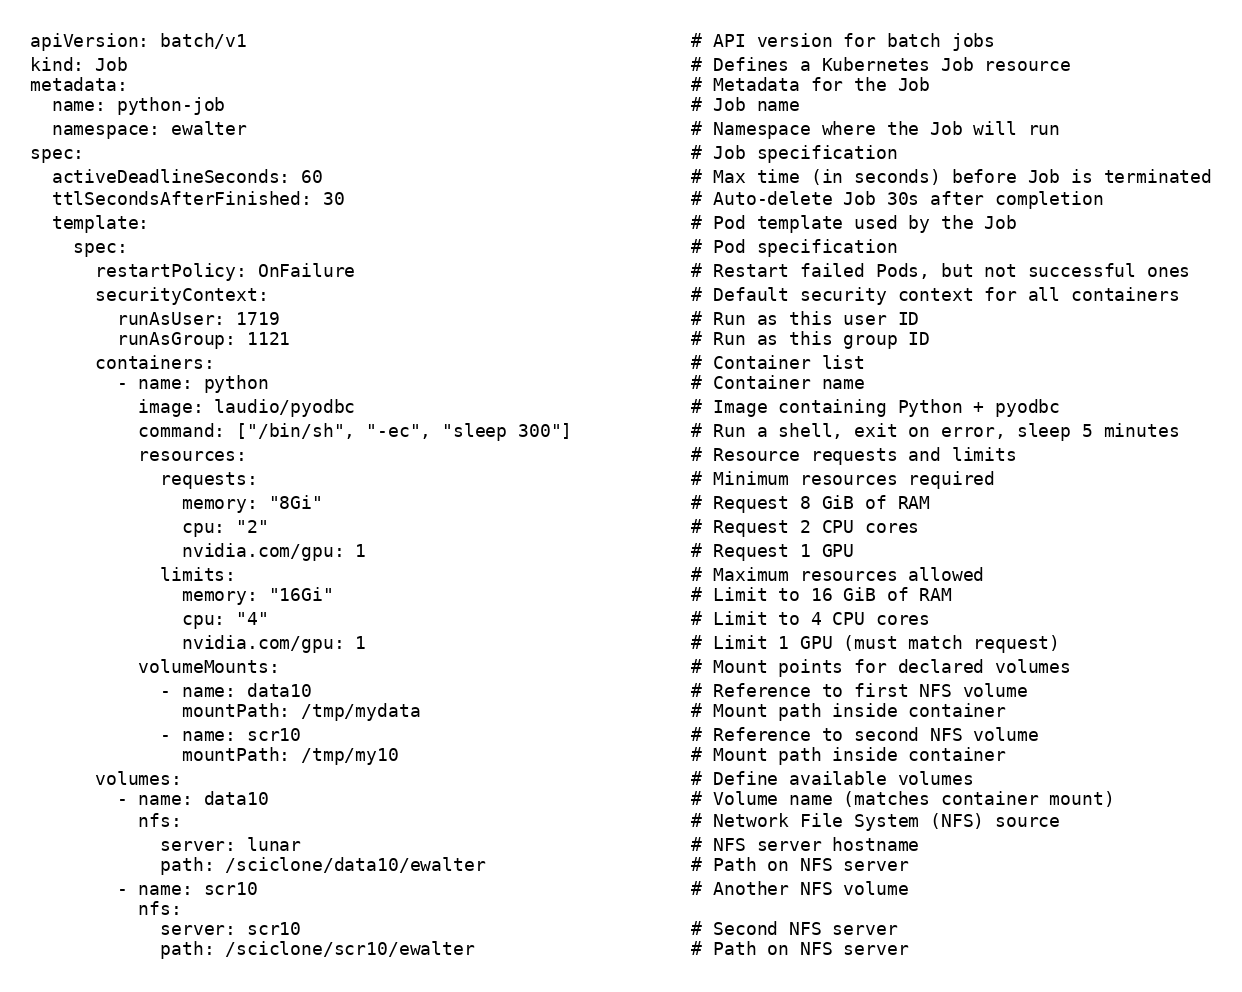
For the job example, here is a summary of how it differs from a pod definition:
-
Uses
kind: Job(apiVersion: batch/v1) instead of a Pod; a controller manages Pods to ensure completion. -
Job wraps the Pod under
spec.template(Pod spec lives inside a template). -
Job adds
activeDeadlineSeconds: 60— kills the Job if it hasn’t finished within 60s. -
Job adds
ttlSecondsAfterFinished: 30— automatically deletes Job resources ~30s after it finishes. -
Pod name is generated from the Job (e.g.,
python-job-xxxxx) rather than being fixed likepython-pod. -
Job defaults to retrying failed Pods (backoff, up to a limit) until success or deadline; a plain Pod does not have Job-style retries.
-
Valid Pod restart policies for a Job are
OnFailureorNever(and are set undertemplate.spec), while a standalone Pod can use other patterns but won’t have Job semantics. -
Job tracks completion status (succeeded/failed counts, conditions), which Pods alone don’t aggregate.
Example job:
(click here to download text version)
Using kubectl - the main command for k8s
In Kubernetes, almost everything you do as a user goes through kubectl - it’s the command-line interface that talks to the Kubernetes API server.
To submit a yml file to run a pod (remember, only project namespaces can use pods):[36 ewalter@cm ~ ]$kubectl apply -f webpod.yml
pod/python-pod created
To check the status of the pod:
[37 ewalter@cm ~ ]$kubectl get podsNAME READY STATUS RESTARTS AGEpython-pod 1/1 Running 0 7s
To submit a yml file to run a job:[36 ewalter@cm ~ ]$kubectl apply -f webjob.ymljob.batch/python-job created
To check the status of the job or the pod within the job:
[6 ewalter@cm ~ ]$kubectl get jobs
NAME COMPLETIONS DURATION AGE
python-job 0/1 43s 43s
[7 ewalter@cm ~ ]$kubectl get pods
NAME READY STATUS RESTARTS AGE
python-job-h2bdt 1/1 Running 0 45s
To open a bash shell within the pod:
[38 ewalter@cm ~ ]$kubectl exec -it python-pod-h2bdt -- /bin/bash
To delete the job or pod:
you can simpy kubectl delete -f the yml file which created the resource:
[62 ewalter@cm ~ ]$kubectl delete -f webjob.yml
job.batch "python-job" deleted
This will delete the job and any pods it spawned
Alternatively, you can kill individual jobs or pods from their name:
[63 ewalter@cm ~ ]$kubectl get pods
NAME READY STATUS RESTARTS AGE
python-job-5xftj 1/1 Running 0 54s
[64 ewalter@cm ~ ]$kubectl delete pod python-job-5xftj
[65 ewalter@cm ~ ]$kubectl get pods
NAME READY STATUS RESTARTS AGE
python-job-5xftj 1/1 Terminating 0 56s
kubectl describe
To get more detailed information on the status of the pod or job use the describe command. This can be useful to see why the pod isn't starting. As an example, lets change the volumes section of the job to try and mount a folder that does not exist:
volumes: # Define available volumes
- name: data10
nfs:
server: lunar
path: /sciclone/data1/ewalter # THIS PATH DOESN'T EXIST
Once the job is launched, you will see that the pod doesn't start:
[53 ewalter@cm ~ ]$kubectl get pod
NAME READY STATUS RESTARTS AGE
python-job-wbkxb 0/1 ContainerCreating 0 31s
And you can find out why if you describe the pod:
[73 ewalter@cm ~ ]$kubectl describe pod python-job-xr2rx
Name: python-job-xr2rx
Namespace: ewalter
Priority: 0
Service Account: default
Node: cdsw00.geo.sciclone.wm.edu/128.239.59.149
.
.
.
Events:
Type Reason Age From Message
---- ------ ---- ---- -------
Normal Scheduled 4s default-scheduler Successfully assigned ewalter/python-job-xr2rx to cdsw00.geo.sciclone.wm.edu
Warning FailedMount 0s (x4 over 4s) kubelet MountVolume.SetUp failed for volume "data10" : mount failed: exit status 32
Mounting command: mount
Mounting arguments: -t nfs lunar:/sciclone/data1/ewalter /var/lib/kubelet/pods/8cfa19d0-1833-461e-8e1a-1bf5d5153f2f/volumes/kubernetes.io~nfs/data10
Output: mount.nfs: access denied by server while mounting lunar:/sciclone/data1/ewalter
If the pod starts it may still crash due to an other errors in the pod. For instance, if I make the command in the webjob.yml definition:
containers:
- name: python
image: laudio/pyodbc
command: ["/bin/sh", "-ec", "uknown_command"]
This pod will start, but will crash because the command unknown_command will not be found inside the pod:
[16 ewalter@cm ~ ]$kubectl get pod
NAME READY STATUS RESTARTS AGE
python-job-xng74 0/1 CrashLoopBackOff 1 (3s ago) 6s
To get more information about the pod, we can look at the pod logs:
[17 ewalter@cm ~ ]$kubectl logs python-job-xng74
/bin/sh: 1: unknown_command: not found
Which shows that the command unknown_command could not be found so the pod will crash.
Other useful commands
Besides kubectl, users can show information about the state of the k8s cluster and current GPU usage:
[90 ewalter@cm ~ ]$getnodestats
Data serialization date: 2026-01-20 17:10:19
Resources are in Allocated/Capacity format.
-----------+---------+-----------+---------+-------------------+------------------+------------+-------------------
Node | CPU | | MEM | GPU | GPU Type | Scheduable | Public | Infiniband
-----------+---------+-----------+---------+-------------------+------------------+------------+-------------------
gu07 | 1/32 | 1/125 | 0/2 | NVIDIA-A40 | True | True | True
gu08 | 17/32 | 61/125 | 1/2 | NVIDIA-A40 | True | True | True
This output lists all k8s nodes, their current CPU, Memory, and GPU allocations. Also listed is the GPU type, whether the node is current able to run pods/jobs, whether a general user can spawn on this node, and whether it is able to mount filesystems over Infiniband.
getgpuusage
Data serialization time: 2026-01-20 13:48:06
------------------+----------------------------+-------------------------+----------+----------+----------+----------------------
namespace | pod name | hours | node | #CPU | #GPU | GPU type
------------------+----------------------------+-------------------------+----------+------ ----+----------+----------------------
<user1> | python-job-p8wgq | 0 Days 20 Hours | gu07 | 16.0 | 2 | NVIDIA-A40
<user2> | coconut6-r75wh | 2 Days 4 Hours | gu08 | 16.0 | 1 | NVIDIA-A40
This output lists the current running pods on the system. Listed is the user running the pod, the name of the pod, how long it has been running, the node it is running on, the CPU and GPU resources being used, and the type of GPU
Accessing storage directories on K8s
NFS mount - users are able to mount any filesystems that are accessible from the Slurm batch cluster (excluding /sciclone/pscr) into their K8s/pods jobs.
NOTE: The scratch filesystems (scr10, scr20, scr30) should be used for job/pod outputs. home/comet has limited space and should be reserved for code and text files, data10/lunar should only be used to archive results after running jobs or to store often used data sets/large input files. The proj-ds filesystem is reserved for data-science projects and acceptable use is up to the Data Science school.
Examples for the major filesystems available to the k8s cluster, for mounting over 1Gb Ethernet:
volumes:
- name: home
nfs:
server: comet
path: /sciclone/home/ewalter
- name: data10
nfs:
server: lunar
path: /sciclone/data10/ewalter
- name: scr10
nfs:
server: scr10
path: /sciclone/scr10/ewalter
- name: scr20
nfs:
server: scr20
path: /sciclone/scr20/ewalter
- name: scr30
nfs:
server: scr30
path: /sciclone/scr30/ewalter
- name: proj nfs:
server: proj-ds
path: /sciclone/proj-ds/geograd/ewalter
This volumes section will allow all of a user's working directories to be mounted within the pod image.
For some nodes Infiniband is enabled which allows for a more performant mount of storage. The getnodestats command will list whether the node supports Infiniband mounts. To mount over infiniband, simply add the '-ib' suffix to the server name in the volumes section:
- name: scr30
nfs:
server: scr30
path: /sciclone/scr30/ewalter
An alternative to using NFS mounted storage is to request a Persisten Volume Claim which lives within the k8s global storage space via rook/ceph. Users must request a PVC to be created by the RC staff via email to [[w|hpc-help]].
Once a PVC is created for you, you will be able to list your PV (Persistent Volume) which will be able to be mounted over 1Gb Ethernet in any image on any k8s node:
[75 ewalter@cm ~ ]$kubectl get pvc
NAME STATUS VOLUME CAPACITY ACCESS MODES STORAGECLASS AGE
ewalter-pv Bound pvc-78b5d9a9-9247-42bf-87db-3cec266b1fed 15Gi RWX ceph-filesystem 6d21h
The to use this PV, you can mount it within the pod section of your yml file:
volumes:
- name: ceph1
persistentVolumeClaim:
claimName: ewalter-pv # pre created pvc
Note, PV's are not accessible from the Slurm/batch clusters.
Getting images for K8s
You can choose the image you want from a cloud-based host like Docker Hub, or build your own image locally (via a utility like podman or docker). For now, we’ll just use “off the shelf” images from Docker Hub, which is the default location our Kubernetes cluster pulls from. One thing to remember is that all jobs/pods will run under your username without root permissions. Therefore, the pod must be usable with this constraint.