
Tables
Is a table the right solution?
To ensure your content is accessible to those using assistive technology, and usable by visitors across device sizes, tables should only be used to display data that needs to be aligned in rows and columns to be meaningful. If you proceed with creating a table, be sure to follow the detailed guidelines below and review your page on a phone or narrow browser window to confirm if a table is still the best solution for the content.
Accessibility Tip: Always apply the tablespecial style to your tables to enhance the visual display and improve usability, including a horizontal scrolling feature on smaller devices. You must also ensure your table is accessible by including table headers and a table caption. Learn more about how to create accessible tables.
Insert/Edit a Table
Place your cursor where you'd like to insert a table, open the Table menu and select Table. Highlight the desired configuration of rows and columns and click the grid to insert the table. You can also right-click anywhere in your content to insert a table.
Place your cursor in an existing table and open the Table menu to access the table properties dialog or delete the table.
Tip: Do not resize your table by clicking and dragging the corner element. As you enter content in the cells the table will size itself automatically, ensuring an optimized layout across device and browser sizes.
Table Editing Quick Actions (Left Click)
Left-click in any table cell to open the available quick actions:

- Table properties
- Delete table
- Insert row before
- Insert row after
- Delete row
- Insert column before
- Insert column after
- Delete Column
Table Editing Sub-Menus (Right Click)
Right-click in any table cell to bring up additional table editing options. From here you can modify cell properties, insert or delete rows and columns, or delete the table.
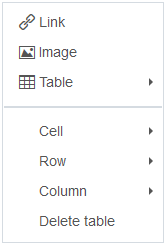
Accessibility Tip: To avoid a potential barrier for those using a screen reader, do not merge cells. Learn more about how to create accessible tables.
Table Properties and Styling
Most settings in the Table properties dialog should not be used, including width, height, cell spacing, cell padding and border. Instead, apply the tablespecial format. This will style your table to complement the website's design:
- Select the table by placing your cursor within the table and clicking "table" in the path display at the bottom of the editor.
- Open the Formats sub-menu, and select Custom > tablespecial. See an example table.
Table Headers (Required for Accessibility)
The cells in a table's first row or first column should define or label the data included in that column or row. To set a cell as a "Header cell" you will need to modify the cell's properties. Once modified, these cells are styled in a darker color with a more prominent font. In addition, for those using a screen reader, the header is then announced before the data in each cell of that row or column.
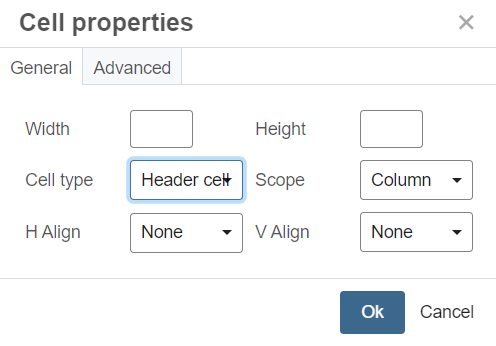
To set a cell as a header cell:
- Right-click on the cell and select Cell > Cell properties
- Toggle the Cell type field to Header cell.
- Set the Scope field to Row, Column, Row group or Column group — this defines for screen readers which cells in the table the header applies to.
Table Caption (Required for Accessibility)
Open the Table properties dialog box and use the Caption checkbox to turn on the caption field at the top of your table. In the field that appears at the top of your table, identify the overall topic of the table. Note: The table caption is only presented to screen readers and will not be visually displayed on the submitted or published page.
Example table captions:
- Break down of tuition and fees
- Count of undergraduate majors declared in 2026
Tip: If you miss this step, the automatic Content Checker will report the issue and let you provide the caption when you submit the page.
Note: For collapsible lists that are built using a table, the caption is required by Cascade but suppressed from being read to those using screen readers for improved accessibility. Fill in a simple caption such as "Collapsible list" to satisfy the system requirement.
Table Style Examples
Default Table Style (Do Not Use)
The example below shows how your table will appear until you apply the necessary tablespecial style. Do not leave a table with this default style.
|
Table Cell Contents |
Table Cell Contents |
|
Table Cell Contents |
Table Cell Contents |
Table with the tablespecial Format Applied (Good Start But Needs Header Cells)
The example below shows the same table, now with the tablespecial style applied (see Table Properties and Styling section). Once this style is applied you can modify your table further — be sure to next add header cells to define the columns or rows of data (see Table Headers section).
|
Table Cell Contents |
Table Cell Contents |
|
Table Cell Contents |
Table Cell Contents |
Table with the tablespecial Format and Header Cells to Define the Columns (Good)
The example below shows the same table with cells at the top of each column set as header cells with the Scope field set to Column (see Table Headers section).
| Sample Table Header | Sample Table Header |
|---|---|
| Table Cell Contents | Table Cell Contents |
| Table Cell Contents | Table Cell Contents |
| Table Cell Contents | Table Cell Contents |