


Teams Calls Migration Station
Ready, set, go... make a phone call!
This webpage will help you get ready for your migration from the Mitel phone system to Microsoft Teams Calls. If you follow the steps, we're confident you'll be ready for Teams Calls!
Already migrated? Skip ahead to the After the Migration... section.
Before the Migration...
Step 1: Learn How to Use Teams & Teams Calls
Microsoft Teams training will be available throughout the phone migration period and on-demand training is available, too! Before attending a training session please review these two training items to get a general idea of what's to come. Our hope is that you will come to the training informed so we can dive right in.
- Managing Calls in Teams (Quick Reference Guide) (.pdf)
- An Introduction to Microsoft Teams and Calling Features (.pdf)
You may also want to go ahead and start using Teams!
These Microsoft videos show Teams Calls in action! This is a list of some of the most popular calling features. Many more calling feature videos can be found on the Microsoft YouTube site.
Welcome to Microsoft Teams{{youtube:medium|jugBQqE_2sM}} |
Calls Overview{{youtube:medium|ykymIT5IL5E}} |
Start Calls{{youtube:medium|4OEQEocWXFU}} |
Transfer/Merge/Park (Change Devices){{youtube:medium|ect_NTOGrtQ}} |
Blind Transfer (Without Introduction){{youtube:medium|9EB_l4tDvXc}} |
Warm Transfer (With Introduction){{youtube:medium|7HSvaoImrQU}} |
Change Settings{{youtube:medium|7iYTDt003II}} |
Mobile Notifications{{youtube:medium|OFqoJMs-Ux8}} |
Set-Up a Delegate{{youtube:medium|P2J6qrLxScw}} |
Step 2: Equipment (Part 1/2)
Say Goodbye to your Desk PhoneThe Mitel phone equipment is not compatible with Teams Calls. Keep your Mitel phone plugged in for now, but once your phone line is migrated, follow the instructions found here to disconnect your Mitel phone and reconnect your computer. Your department's phone coordinator can provide instructions on where phones should be taken once disconnected. When ready, W&M IT will be coming by to collect your department's Mitel phones for recycling. |
Order Headsets/Desk Phones (Optional)The same equipment currently used for Teams and Zoom meetings can be used for phone calls via Teams. However, you may wish to purchase a headset or desk phone to use with the new phone system. For most office users, headsets are recommended over desk phones, as they will provide the maximum benefit and flexibility when used with Teams calling features. There are a few instances where desk phones may be the better option. Departments are responsible for ordering phone equipment and providing equipment for employees (if desired). Contact the telephone coordinator in your department for ordering phone equipment. Phone equipment can be purchased through buyW&M using the W&M IT Teams Phone Equipment tile under Showcases. Please be aware that there are no returns or exchanges! A demonstration area is available at the Circulation Desk of Swem Library. Information about Teams Calls equipment for departments Important! Firmware on the headsets and/or accompanying dongle may have to be updated prior to use. (See next item on list) |
Update Firmware on Wireless HeadsetsFirmware on the wireless headsets and/or accompanying dongle will have to be updated prior to use. After receiving your headphone, plug it in to your computer, and then visit Poly Lens to install the software that allows you to make updates. |
Coordinate "Common Area" PhonesPhones that are not tied to person, but rather tied to a place (like conference room phones and service desk phones) require a "Common Area License". Common area phones also require a desk phone. In most cases, departments must purchase the Audiocodes 455 phone. Equipment for some common area phones, like hall phones and emergency phones, will be provided and maintained by IT. |
Step 3: Wrap Up With Mitel
Download any Mitel Voice Mails (Optional)Voicemails in the Mitel system will be erased when your phone number is migrated. Follow these instructions to save any Mitel voice mail messages by forwarding them to yourself in an email.
 |
After the Migration...
Before doing anything else, make sure that your account migrated properly. Open Teams and select Calls from the menu on the left hand side. You should see a dialpad in the left hand column of the window. If you do not see a dialpad, contact [[support]] or use the IT - Teams Calling Migration Support team to let us know.
Step 4: Equipment (Part 2/2)
Disconnect your Mitel/ShoreTel Desk PhoneOnce your phone line is migrated, follow the instructions found here to disconnect your Mitel phone and reconnect your computer. Your department's phone coordinator can provide instructions on where phones should be taken once disconnected. When ready, W&M IT will be coming by to collect your department's Mitel phones for recycling. |
Update Firmware on Wireless HeadsetsFirmware on the wireless headsets and/or accompanying dongle will have to be updated prior to use. After receiving your headphone, plug it in to your computer, and then visit Poly Lens to install the software that allows you to make updates. Troubleshooting tip: If you are having issues, you may need to make updates to your computer's operating system (ex. Windows updates.) We have found this to be helpful. Restart your computer to run the operating system updates. Then run any new headphone and dongle updates through Poly Lens. |
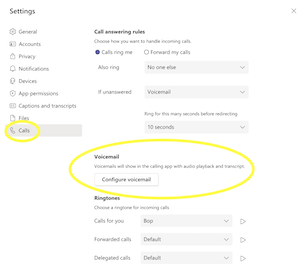
Step 5: Set Up Voicemail
Configure your Teams Calls Voicemail to start using it.
Record a Greeting
|
Check Your Voicemail
|
Record an Out-of-Office Greeting
|
 In Teams, click your profile picture in the top-right corner of the window
Step 6: Adjust Your Settings
Adjust your settings to make sure Teams Calls fits your preferences.
Find SettingsSetting for Calls (and Teams, in general) can be found by clicking on the three dot icon on the top-right corner of the client window. If you hover over the dots, it will say Settings and more. Click Settings. Most setting for Teams Calls will be in the Calls section. However, some calling-related settings are found in the General, Notifications, and Devices sections. In the Teams mobile app, find Settings by clicking on your profile picture in the top-left corner of the app window. |
Select Ringtones
|
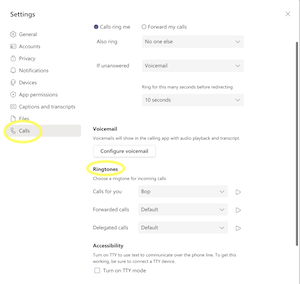 You can set different ringtones for different types of calls (calls for you, forwarded calls, or delegated calls.)
Step 7: 911 Compliance - Enable Your Location
IT-Managed Computers (PCs & Macs)Typically any computer you login to with your W&M username, Teams is configured and ready to go! Simply open the app and refer to the Calls tab to place phone calls. |
Mac OS ComputersFor unmanaged Mac computers:
|
iOS DevicesFor iPhones and iPads:
|
Android DevicesFor Andriod mobile devices:
|
Step 8: Mobile App (Optional)
Get the most out of the flexibility that Teams has to offer by downloading the mobile app.
Show Calls on Menu Tray
|
Set Quiet Hours & Quiet DaysDon't want to get work calls on the weekend? Set quiet hours on the Teams mobile app to prevent calls (and other notifications) on your cell phone when you are "off the clock".
|
Block Notifications on Mobile App when Using Desktop
If you aren't receiving mobile notifications while active on your desktop, and your would like to, follow these same steps, but toggle the switch to deactivate. |
iPhone - Enable Calls
|
 You can display Teams Calls on the quick access menu tray at the bottom of the app window.
 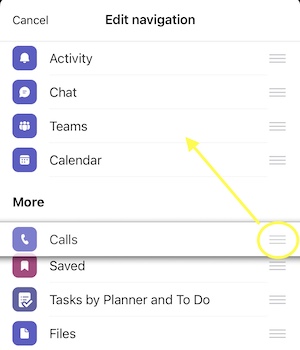 To add Calls to the tray:
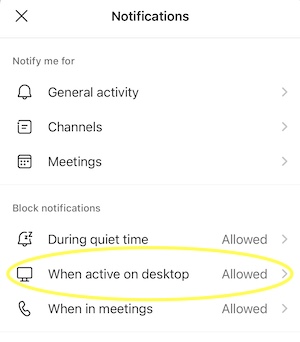 When the Teams desktop application is in use, Teams Calls notifications can be directed to only the desktop client, if preferred.
 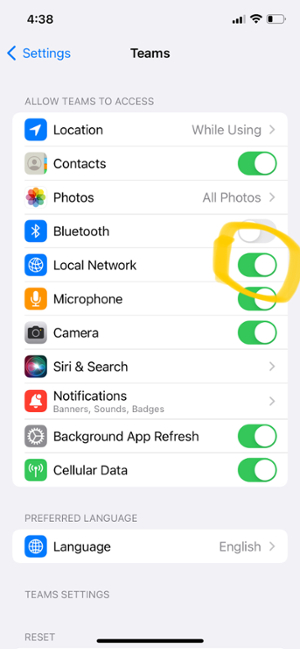 In order to place calls from your Teams iPhone app, you must have the Local Network setting on your iPhone enabled. To do this:
Step 9: Find Support Resources
W&M IT Support Team on TeamsImmidiately following your migration, you will be entered into a Teams team called IT - Teams Calling Migration Support. This is a direct line of support for Teams Calls. Feel free to ask questions or report any issues. You can also scroll back in the chat history and see responses to questions that others have asked. You will be in the team for two weeks following your migration and then automatically removed from the team after the two weeks have concluded. For support after the two-week period, contact [[support]]. |
Teams Training Site (Microsoft)
|
Microsoft CommunityMicrosoft Teams Tech Community is a space for how-to discussions and sharing of best practices for Teams. |
Contact W&M IT SupportIf you need additional help with Teams Calls, please call the Technology Support Center (TSC) at 757-221-4357 or email [[support]]. |
